
MacintoshPi is a small project that allows running full-screen versions of Apple's Mac OS 7, Mac OS 8 and Mac OS 9 with sound, active Internet connection and modem emulation under Raspberry Pi. All this without the X.org manager, only a multimedia SDL2 library and from the CLI / Raspberry Pi OS Lite. This lets emulators use full power of Raspberry Pi, making them more stable and useful in combination with additional retro-software. Installation requires running a single script on a clean Raspberry Pi OS Lite and waiting about two hours for the packages to compile and install. In addition, thanks to a document contained in the project, it is possible in dual-boot to place the fastest (bare-metal) Commodore 64/128/PET emulator BMC64, thus building an interesting retro package on a single SD card. The entire MacintoshPi project runs on Raspberry Pi Zero 2 W, 2, 3, 3B, 3B+ (at present, it does not run on version 4).
Below you will find a short clip showing what MacintoshPi can do:
A much longer version of the clip can be found here.
Project components
The project consists of the following auto-compiling and installing bash scripts for Raspberry Pi:
- Macintosh 68K emulator Basilisk II supporting Mac OS 7 (System 7.5.5) and Mac OS 8,
- PowerPC emulator SheepShaver supporting Mac OS 9,
- Commodore 64/128/Pet emulator VICE,
- A Virtual Modem using the tty0tty and tcpser projects, running with the two aforementioned emulators for Apple and Commodore products, and on Raspberry Pi OS itself, as well as allowing any original terminal retro-software to connect with modern-day telnet BBSs,
- CD-ROM, DVD-ROM emulator CDEmu which allows mounting CD images (iso, toast, cue/bin, mds/mdf etc.) under Raspberry Pi OS – runs with BasiliskII and SheepShaver emulators, as well as on Raspberry Pi OS. The emulators are configured automatically to support that virtual CD-ROM drive.
- A consistent launcher that runs all of those systems at different resolutions (after reboot) and in different configurations.
- SyncTERM – an application for connecting with BBSs from the Raspberry Pi OS, compiled in combination with the SDL library,
- Information how to run Raspberry Pi OS in dual-boot with BMC64, the fastest Commodore emulator for Raspberry Pi (bare metal/low latency emulator).
Mac OS images are pre-configured to support online connections.
Installation
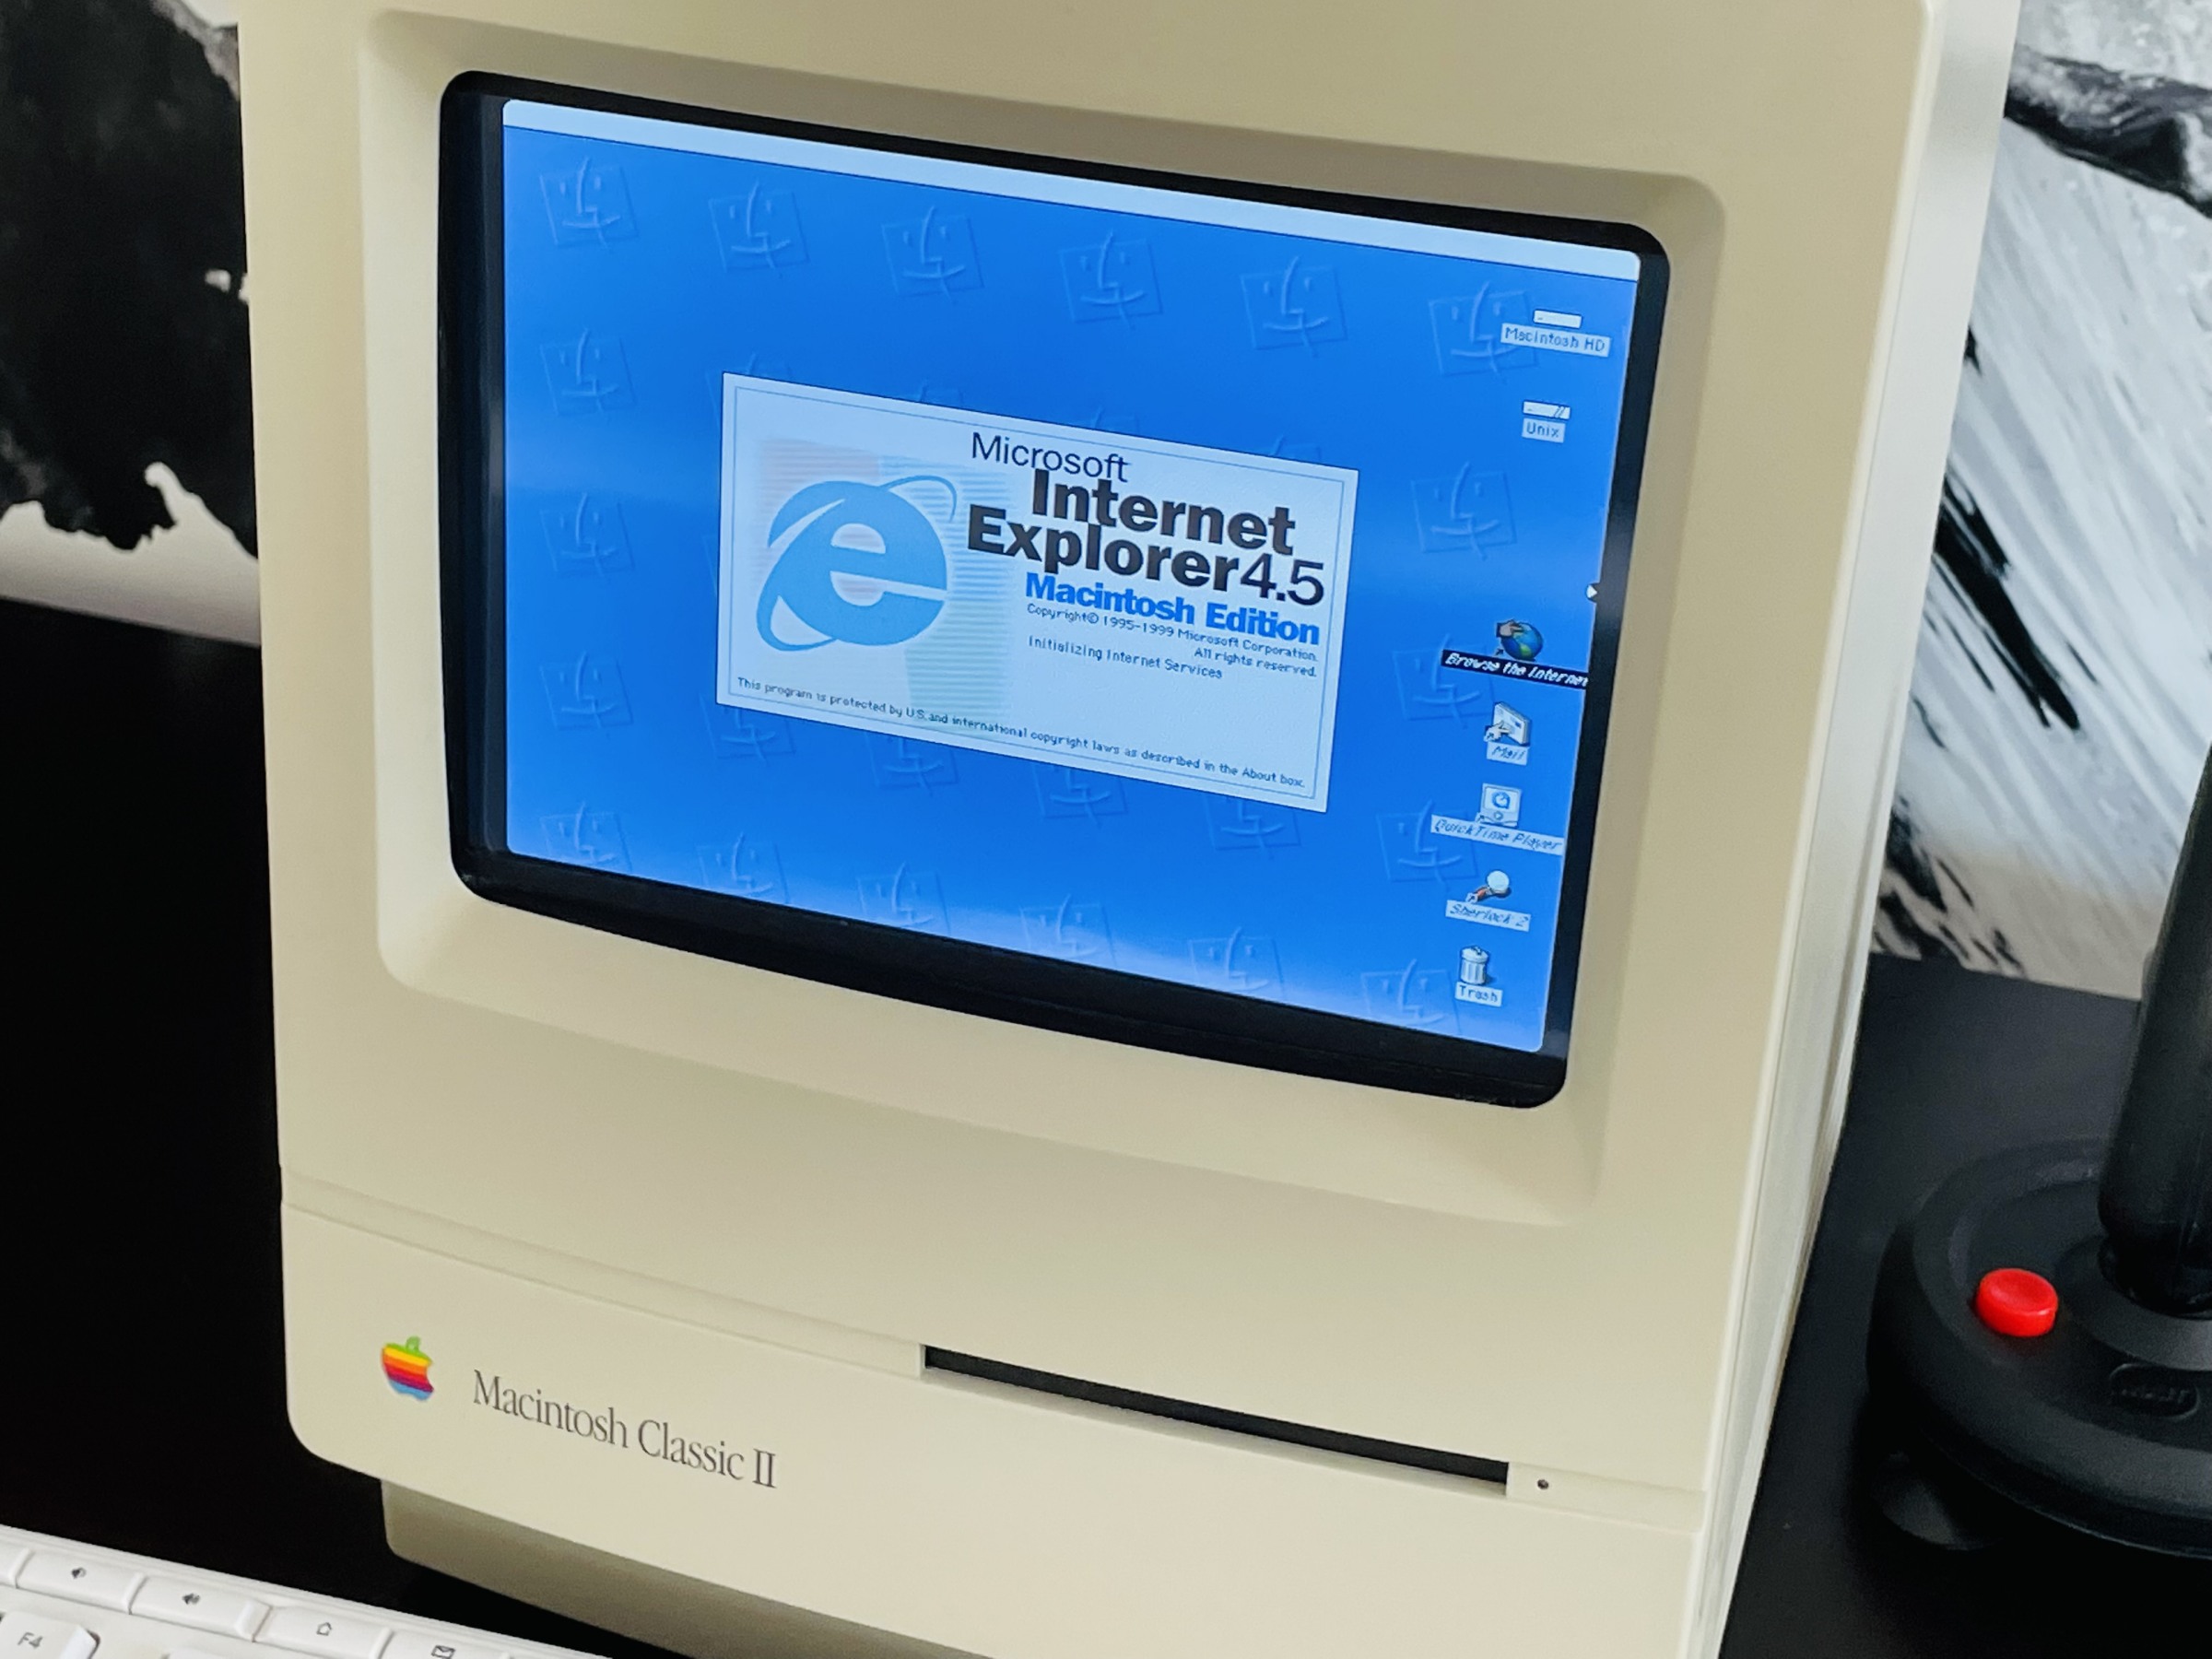
The project must be installed on a clean Raspberry Pi OS Lite (Legacy) or the full version of Raspberry Pi OS (Legacy), but in the latter case you must first switch to command line or set system start to CLI.
Raspberry Pi OS (Legacy) can be installed from the Raspberry Pi Imager level by selecting: CHOOSE OS -> Raspberry Pi OS (other) -> Raspberry Pi OS (Legacy), CHOOSE STORAGE -> WRITE.
Installation of the entire MacintoshPi package requires running the single command ./build_all.sh – all dependencies and required packages will be installed automatically:
git clone https://github.com/jaromaz/MacintoshPi
cd MacintoshPi
./build_all.sh
# That's it - now you can run, for example, Mac OS 9:
mac os9
The process of compiling and installing packages can take about two hours.
Each of these sub-projects can be installed separately by running the corresponding compilation & installation script contained in the directory relevant to the sub-project concerned. The installation scripts must be run from the pi user.
Detailed descriptions of MacintoshPi project components
Basilisk II (Mac OS 7 and 8) and SheepShaver (Mac OS 9)
The script downloads all files required to start Mac OS – ROMs, system images, and creates configuration files. On installation, directory /home/pi/Downloads will be visible on the Apple desktop as a Unix directory – files can be copied both ways between those two resources, but applications cannot be launched directly from that directory. In addition, the so-called NetDriver is also compiled, which allows full online access from virtualised Apple systems.
Up till now, Mac OS 9 in the full screen mode (without the unnecessary window manager) has not been available for Raspberry Pi. This is perhaps the first such implementation which allows using Mac OS 9 and SDL2 in the full screen mode with sound and online connection – even on the small Raspberry Pi 2W.
Each system must be launched with the appropriate command: mac os7, mac os8 or mac os9. The additional file .img or .dsk can be added to the launched system by adding the image file name at the end of the command which invokes the system concerned, e.g.
mac os9 demo.img
Basilisk II and SheepShaver emulators can be stopped by using the key combination CTRL+SHIFT+ESC. This causes an immediate return to the command line. The COMMAND key is acquired with the left ALT key in Mac OS 9, and with the CTRL key in Mac OS 7 and Mac OS 8.
For more information about those emulators visit the BasiliskII and SheepShaver websites.
VICE
The script that compiles the VICE Commodore emulator which can be used for connecting an emulated Commodore with modern BBSs. It allows downloading files which can be used on the same Raspberry Pi device, but on the fast BMC64 emulator installed in dual boot. On installing the BMC64 partition to rootfs, data can be downloaded from a BBS directly to the virtual drive that will then be available automatically in BMC64. The VICE emulator for Raspberry Pi is very slow, which is why it is recommended to use the BMC64 emulator for more demanding applications. For more information about the VICE emulator visit the project's website.
MacintoshPi Virtual Modem
A script that compiles and installs a virtual modem in Raspberry Pi OS, allowing connection with modern-day telnet BBSs using any terminal software launched on the aforementioned Basilisk II, SheepShaver and VICE emulators, and on Raspberry Pi OS itself.
The MacintoshPi Virtual Modem is controlled by systemd and uses the tpcser software which, through the tty0tty project, writes to virtual device /dev/tnt0. The data can be read from another virtual device /dev/tnt1, which thus becomes a virtual serial port in the system.
The modem must be started using the following command:
sudo systemctl start vmodem
It can be reset or paused with the standard systemd commands:
sudo systemctl stop vmodem
sudo systemctl reset vmodem
The virtual modem can also be left running permanently in the system using the following command:
sudo systemctl enable --now vmodem
Speed (bps) change options can be set in the configuration file as per example entries provided with it:
/etc/vmodem.conf
To connect with a telnet BBS, just run the following command on terminal application:
ATDT telnet_url:port
For example:
ATDT borderlinebbs.dyndns.org:6400
The virtual modem cooperates with the VICE Commodore 64 emulator, but only with a version launched with the x64sc file.
Modem speeds depending on emulation
| System | Maximum speed bps |
|---|---|
| Commodore / VICE | 2400 |
| Mac OS 7-8 / BasiliskII | 28800 |
| Mac OS 9 / SheepShaver | 28800 |
| Raspberry Pi OS | 38400 |
Configuring a virtual modem
-
In VICE Commodore 64, run command x64sc and select: F12 -> Machine settings -> RS232 Settings:
Set the screen as per the figure below, also marking appropriate dots in green with: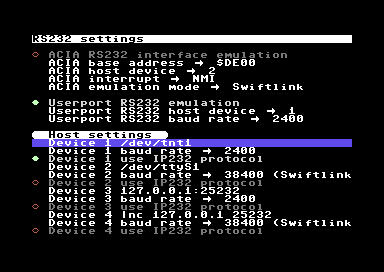
-
In Basilisk II and SheepShaver, configuration is already performed automatically in their configuration files. In Apple terminal application, just select the standard serial port and modem speed as set under Raspberry Pi OS in file
/etc/vmodem.conf(default 2400 bps). -
In terminal applications directly under Raspberry Pi OS (e.g. minicom), just indicate the serial port:
/dev/tnt1and speed as shown in file/etc/vmodem.conf.
CDEmu
A script which compiles the CDEmu CD/DVD emulator, allowing mounting CD and DVD images in iso, toast, cue/bin, mds/mdf and many other formats. The application is similar to Daemon Tools for Windows and runs with BasiliskII and SheepShaver as well as on Raspberry Pi OS. It allows you to create an image of an old CD-ROM, copy it to Raspberry Pi and install software from it in an Apple system emulated on Raspberry Pi.
It is no longer necessary to copy .toast files to the disk image or mount them with software for Mac OS – you can now unpack a .sit file under Raspberry Pi OS using the unar command, and then mount the unpacked .toast file also under Raspberry Pi OS using the cdload command, and use the CD image on any Mac OS as you would from a regular CD-ROM. Audio CDs launched in CDEmu run correctly in Raspberry Pi OS both in the graphic and text mode, but sound does not work in the Basilisk II or SheepShaver emulators. For more information about CDEmu visit the project's website.
A CD image can be easiest mounted using the command:
cdload image.toast
The CD will be available in the virtual device:
/dev/sr0
The image can be unloaded from the virtual device using the command:
cdunload

MacintoshPi Launcher
The maximum emulator performance is achieved in the native resolution of the emulated system, i.e. it is recommended that Raspberry Pi should start in e.g. 640×480 resolution if we want to launch Mac OS in 640×480 resolution on it.
The launcher's task is to launch a given version of Mac OS, and if one is already running with appropriate parameters, then to overwrite config.txt and any other system files with the appropriate screen resolution and position assigned to a specific system or any other defined application, and then to launch the emulator or application right after a system restart, this time in the new resolution.
The name of the directory with the data with which the system is to be overwritten is identical as the name of the parameter following the mac command, e.g. mac os8-480 will restart Raspberry Pi OS in 640×480 resolution, and then launch Mac OS 8 also in that resolution, but the mac os8 command will simply launch Mac OS 8 in the most recently selected resolution.
The Launcher allows also .img or .dsk files to be added to Mac OS using e.g. mac os7 plik.img – then the Mac OS concerned will be launched and the image content will appear on the desktop as an additional drive.
SyncTERM
It is currently the best application for connecting with modern-day BBSs using the telnet protocol. It is compiled with options which use the SDL graphic library, thanks to which it uses a wide selection of appropriately adapted fonts in the graphic mode rather than system fonts. Again, SyncTERM does not require X.org to run, and the program itself launches in the full screen mode by default.
Raspberry Pi OS dual-boot
Information about the possibility to launch Raspberry Pi OS in dual boot, along with BMC64, the fast Commodore emulator, is contained in a separate README dual-boot.
How to install additional software
Software for Mac OS 7, Mac OS 8 and Mac OS 9 can be found on the following websites:
These websites can be used comfortably in the Chromium browser directly in Raspberry Pi OS – downloaded files are saved by default in directory /home/pi/Downloads, which is configured as a shared directory for all Mac OSs contained in this project – under Mac OS, it is displayed as a Unix drive.
Although not every downloaded app will run in the Basilisk II or SheepShaver emulation (this is the case with e.g. OpenGL applications), the vast majority will run correctly. Before downloading, make sure that the software is from the abandonware group or purchase the required licence if still possible.
There are three methods to install the software, depending on the type of the file downloaded:
-
The file downloaded has the
.sitextension and contains either a.toastor.isoCD image:unpack the file under Raspberry Pi OS using the
unar file.sitcommand; remove any spaces from the name of the unpacked.toastfile (if there are any), and then mount the.toastfile using thecdload file.toastcommand. Next, launch a given Mac OS version and install the software from the virtual CD drive that will be displayed on the desktop. -
The file downloaded has either the
.sitor.zipextension, and contains an.imgor.dskfile:unpack the file under Raspberry Pi OS using either the
unar file.sitorunzip file.zipcommand; remove any spaces from the unpacked.imgor.dskfile and launch a givenMac OSusing themac os7 file.imgcommand – then the image will be automatically added to the system and will appear as an additional drive on the desktop. -
The file downloaded has the
.sitextension, and contains software dedicated directly to Mac OS:first download an image of
Stuffit Expanderapp and install this software inMac OS; next, take the.sitfile proper originally downloaded to theDownloadsdirectory and copy it, already in Mac OS, from theUnixdirectory to the Macintosh HD virtual drive and double click the file to unpack it directly in Mac OS.
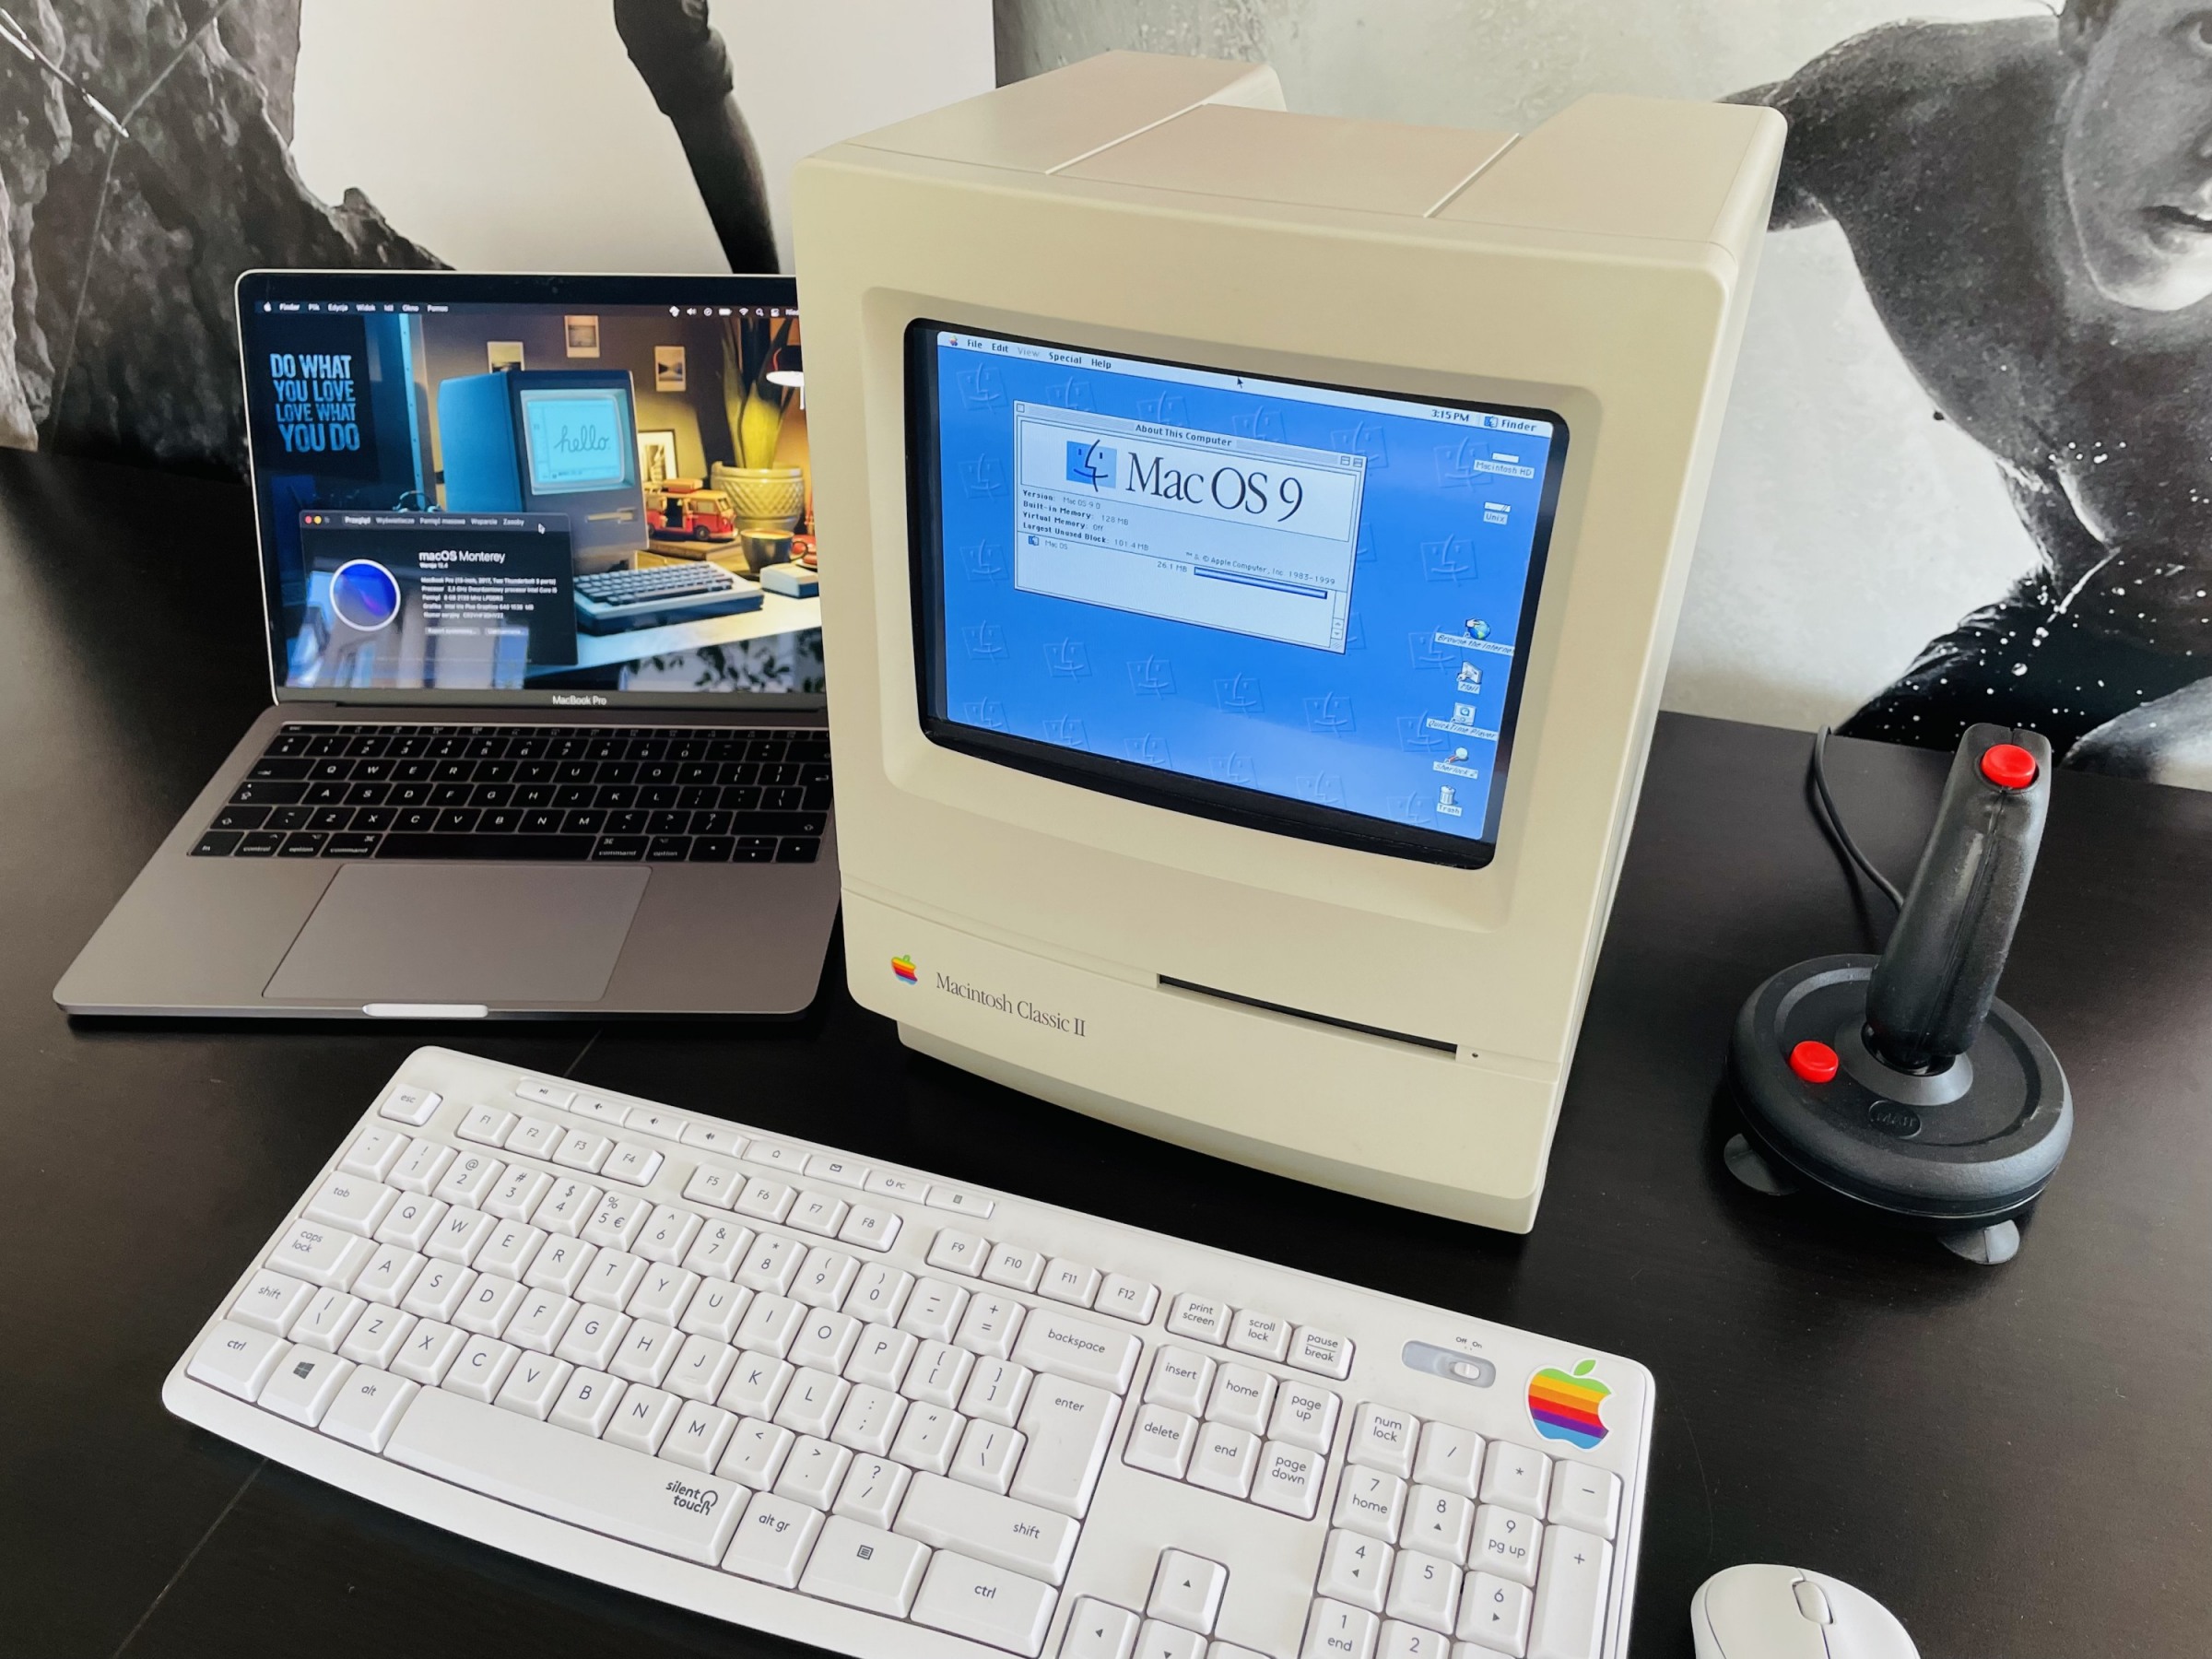
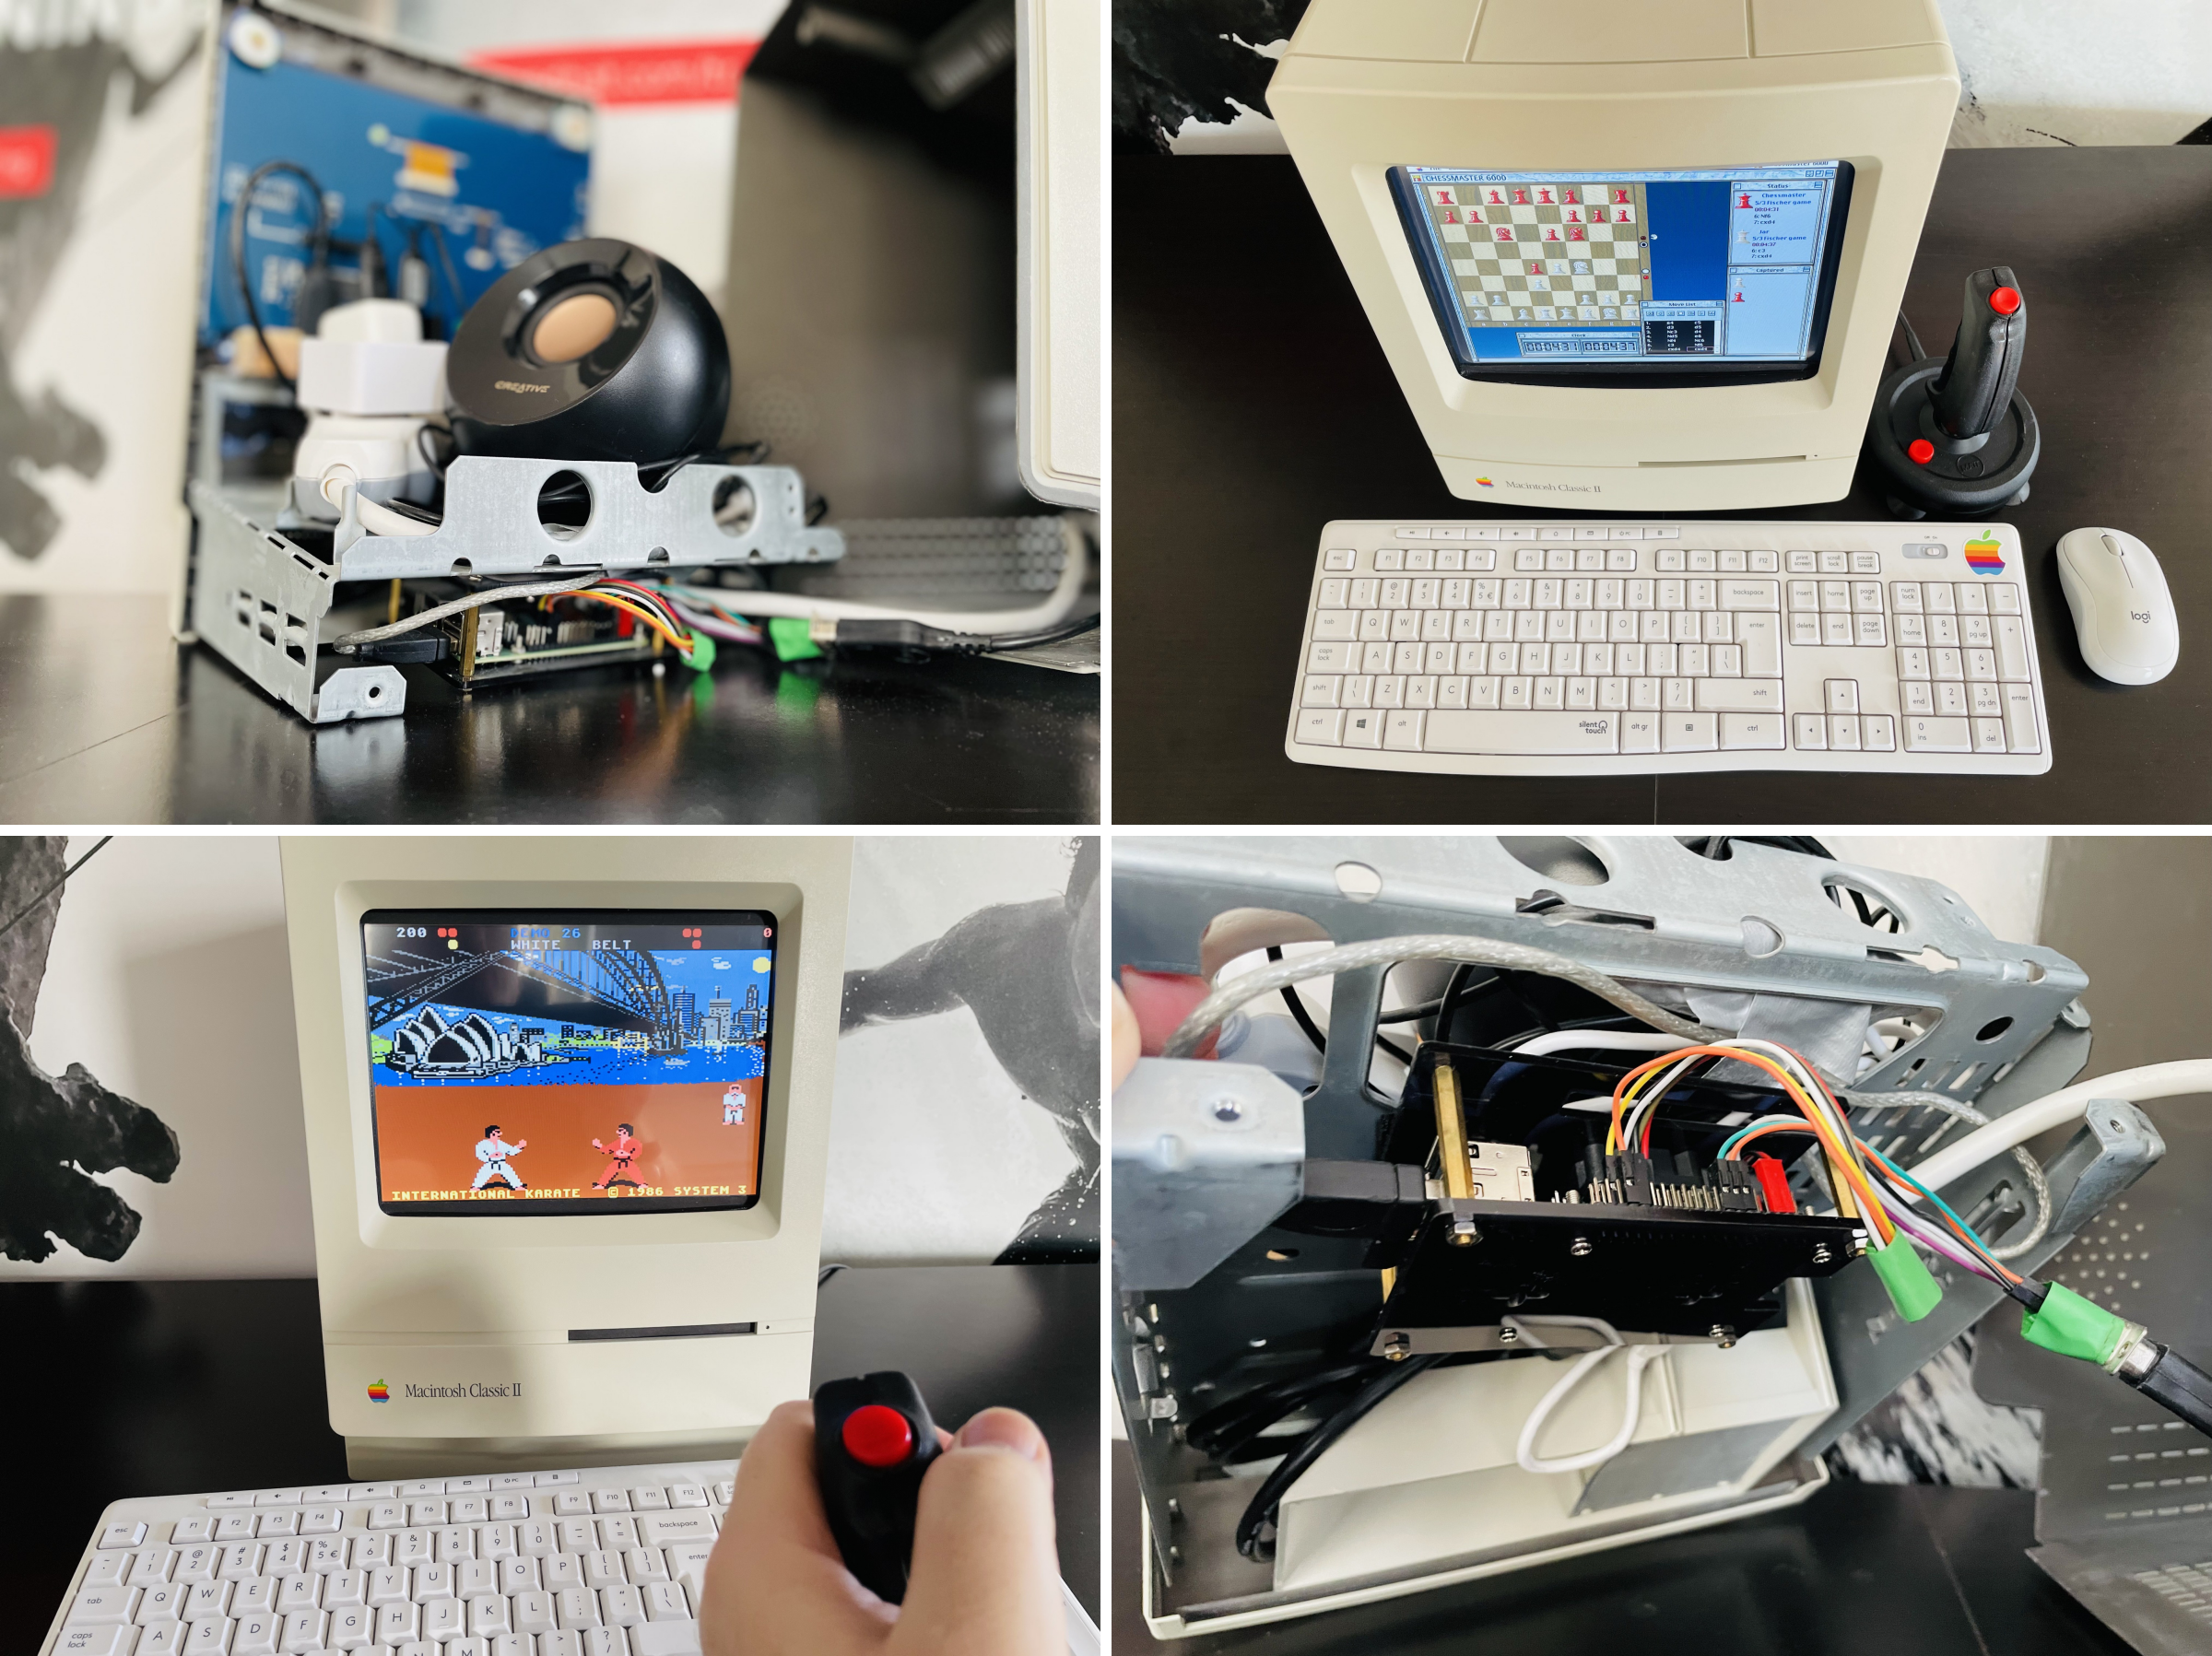
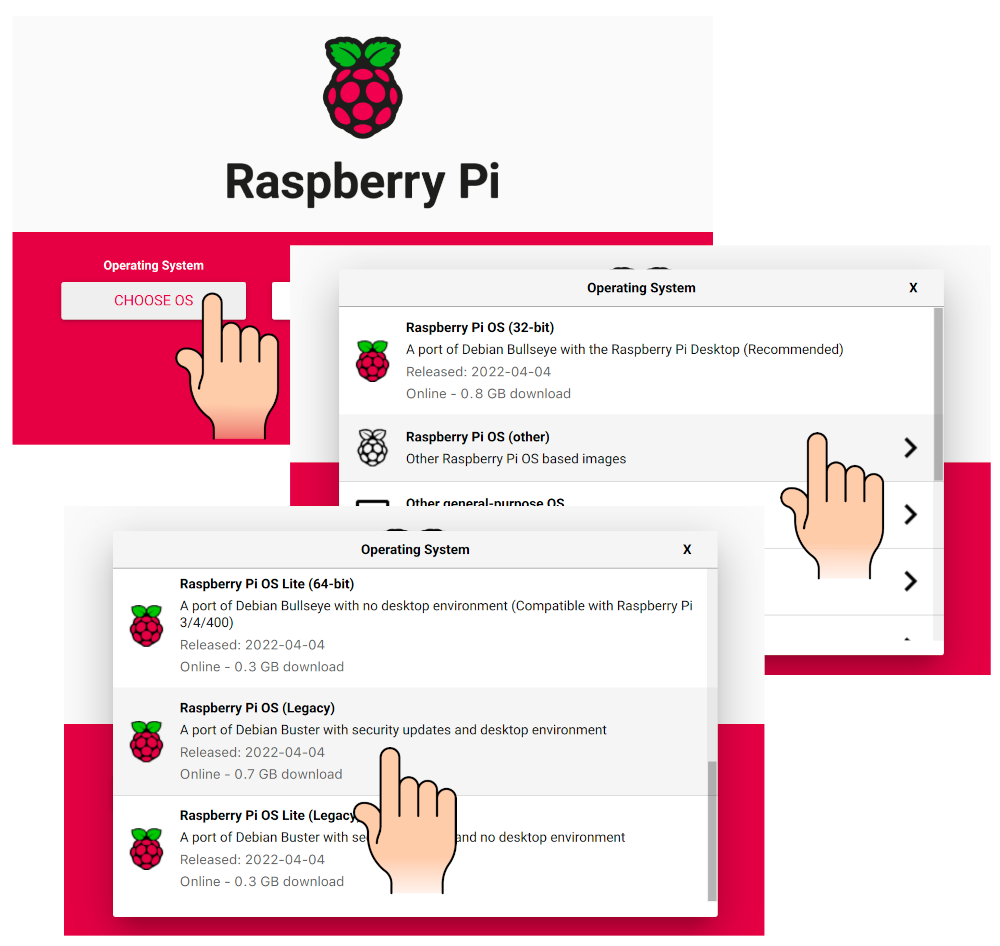
About my Macintosh Classic II
My version of MacintoshPi is driven by Raspberry Pi 3B+. I bought my Macintosh Classic II case on eBay – it was completely yellow, but I restored it to the factory condition by means of 18% hydrogen peroxide and appropriate light exposure.
Its LCD IPS 10.1’’ 1024x600px HDMI Waveshare 11870 screen is turned 180°, so that the wiring does not interfere with the upper Macintosh frame. I filled up the space between the flat screen and what was left of the CRT shape with a 3D printout designed by the authors of the 2GuysTek YouTube channel. The Wondershare screen is a bit too wide, but appropriate operation of the config.txt file allows software rotation and precise definition of the displayed screen image for each system or application (after a restart). The screen is also too low, which is why I filled up the void with black cardstock, and so those elements are practically indistinguishable (they look like the black background of the frame surrounding the screen). However, I recommend using a different, slightly larger screen, and then use software to reduce the screen image displayed and establish its appropriate position.
The keyboard and mouse are Logiteh MK295 Silent Wireless Combo – they only slightly similar in style to peripheral devices supplied back in the day, but they are also wireless and use a single bluetooth dongle. I added two speakers connected to a Raspberry Pi 3B+ analogue audio/jack input and to a splitter. I integrated all those elements inside the Apple Macintosh Classic II case.
The project source can be found on 
They write about us


Podcasts about the project
 @ 33:25
 @ 36:26
 @ 47:15
Support
You can transfer any funds you wish to my PayPal account if you want to support this project.
This is fascinating.
I hope some day you will update this project to run on a Raspberry Pi 4B and the non-Legacy Raspberry Pi OS.
Great work on this. How do you get back to the Rasperian Gui from the launcher prompt?. Also having problems with overscan only working for width not height. Thanks
I can’t help you with overscan, but return to Raspberry Pi OS Desktop can be made with the command: mac pios
Thank you for doing this. Great Project!
I’m using a Waveshare 10.1 inch display connected to a Raspberry Pi 3b via HDMI. The Mac OSs don’t display properly, the image scrolls to the right (like a vintage TV when the horizontal hold needed adjustment) and vertical lines display as diagonal. Do you have any thoughts on what setting(s) could be causing this?
Thanks
I can’t help you – I don’t know what could be the cause. Look on the forums for SheepShaver, Basilisk and Waveshare.
Try the latest version of MacintoshPi 1.4.1 – it should help. But before that read the new installation section on README.md.
Thank you for an amazing work you’ve done.
I had some problems building the cdemu component though, and I can’t make it work. It fails requesting some components that are not installed on the barebones Raspberry OS Lite legacy, such as a python library (can’t remember the name). However, that is easy to fix by installing the component manually. The real problem is that the emulator talks to dbus that comes with xorg, and the lite version of Raspberry does not have that. Even when I’ve installed dbul manually, I had no success, most probably because the settings are not right. Do you have any suggestions?
Recently, the project was tested only on Raspberry Pi OS (FULL) Legacy. Install that system, set the boot to CLI (as instructed in the MacintoshPi README) and try again. Maybe someday the full window manager from Rasbperry Pi (FULL) Legacy will be useful too :) On my Macintosh I use it quite often.
aw rats, this is why I installed the MacPi to access CD ROM content. Darn. :) Now I have to redo the whole thing with FULL? Double dagnabbit.
Oh otherwise I am LOVING it, btw :D
Oh and another annoying thing about Lite? You have to mount the USB sticks which is a pain. :(
Oh, I was wrong about the USB sticks. Everything working perfectly now. Apart from I tried out the commodore setting and now my CLI screen has shrunk to a fraction of its usual full-screen size and I can’t seem to get it back to full screen . . . any thoughts?
Try the latest version of MacintoshPi 1.4.1 – it should help. But before that read the new installation section on README.md.
hi
could you help me please:
for older systems, i was able to install apple 1 and apple 2, but when i am trying to install altair imsai,
i am getting errors:
make: Makefile.linux: No such file or directory
make: *** No rule to make target ‘Makefile.linux’. Stop.
make: Makefile.linux: No such file or directory
make: *** No rule to make target ‘Makefile.linux’. Stop.
cd /usr/share/macintoshpi/z80pack/imsaisim && ./cpm22
cd /usr/share/macintoshpi/z80pack/imsaisim && ./imsaisim -x roms/xybasic.h
when i try to run imsai:
env: ‘./imsaisim’: No such file or directory
where am i making mistake?
thanks
The z80pack project has been updated. I have included these changes and moved these emulators to the new DinosPi project https://github.com/jaromaz/DinosPi . They can now be installed on the latest version of Raspberry Pi OS Lite (they work in CLI mode).
homer-retro.space has been down for several days and I’m unable to run the build file successfully. Any plans to point to other images elsewhere or do you know if this is a temporary outage?
I see that it works again :)
Awesome project, thanks so much! I’m having issues though and it’s launching or trying to launch os8 with the launcher, just displays a blinking cursor. The command line interface isn’t my strong suit anymore
Try the latest version of MacintoshPi 1.4.1 – it should help. But before that read the new installation section on README.md.
Amazing work! Got a Kano Computer Kit Touch / 10.1 touch RPI3B hub and a Macintosh SE shell. Every worked as in the tutorial. Just a small piece to make it complete is the Floppy slot. I have a usb floppy and can be mounted to cover that empty space, tried it with the pi obviouslly can’t see it but what if it could really work? just for fun that is would be cool l,just like my powermac 6100
Thanks for this great project and for doing all the heavy lifting!
I created a new SD with Raspberry Pi OS Legacy (Full), then rebooted into CLI did the Git clone, and ran the script, and it completed with no error messages .
when I try to run the ‘mac’ command to start either Mac OS9 or OS8, it reboots to load it, but then the screen goes blank for 15-20 seconds before a cursor appears and I’m in the Raspberry Pi CLI, do you have any ideas what I’m doing wrong?
Try the latest version of MacintoshPi 1.4.1 – it should help. But before that read the new installation section on README.md.
Thanks, I created a brand new installation with the corrected legacy version of Pi OS (2022-4-4), I use it to boot and then do the Git clone successfully, but when I use ‘./build_all.sh’ it completes after ~30 minutes and the ‘mac’ command doesn’t work/isn’t found.
I’ve tried running the individual build scripts and the non-macOS ones work but the macos7/8/9 build scripts start correctly with their ASCII splash screens but then reboot the Pi.
I can’t find any log files that might help determine what’s going wrong, do you have any suggestions?
You probably have a faulty device, reboot during compilation means Raspberry Pi is heating up too much. Try adding a fan of some sort.
You have to use the installation instructions that are in the README of the latest version of MacintoshPi on the site: https://github.com/jaromaz/MacintoshPi/#readme
Hi there,
I am having a similar issue to Ian and there’s no heat buildup issue/pi feels relatively warm but not hot to touch.
NEW CARD
1) Followed as written – Raspberry Pi OS (Legacy) can be installed from the Raspberry Pi Imager level by selecting: CHOOSE OS -> Raspberry Pi OS (other) -> Raspberry Pi OS (Legacy), CHOOSE STORAGE -> WRITE.
2) Set to ClI and Network Set to On.
3) 30 minutes of compiling. No errors. See an ALL DONE and back to pi@raspberrypi prompt.
No MacintoshPi nor mac command. I can see within /home/pi/MacintoshPi, I see folders “assets” “cdemu” “dual-boot” “launcher” “macos7” “macos8” “macos9” “syncterm” “vice” “vmodem” the build_all.sh, a license text file and readme.md.
But I can’t DO anything? Please advise.
ok I see the problem. You have to use the installation instructions that are in the README of the latest version (1.4.1) of MacintoshPi on the site: https://github.com/jaromaz/MacintoshPi/#readme
Hi Jaromaz,
Unfortunately, it still doesn’t work.
1) I re-read the installation instructions, used the legacy legacy file and imaged the SD card again.
2) Setup the raspberry pi image, DID NOT update the file in setup.
3) Changed to CLI and wait on network.
4) Went to command prompt. Entered in the code lines as written. Went to MacPi setup and asked to reboot/update again and if so, enter Y. I DID NOT update as I thought it should stay with that specific file. Ran for 45 minutes this time and received an error: Could not install Mac OS 7.
5) Kicked out to pi@raspberrypi.
How do I get this to run? What’s missing to activate MacintoshPi and boot into your interface?
Thank you for your time and patience in advance.
> I DID NOT update as I thought it should stay with that specific file
you need to upgrade the system – even though it is legacy it is still possible :) You can do it before with the command sudo apt-get update && sudo apt-get upgrade or just follow the script commands. After the upgrade, the system will reboot and you will need to run build_all.sh again.
Hi Jaromaz,
That helped…was able to upgrade, reboot, rebuilt with build_all.sh.
A few more questions…
1) When i type mac os7 or os8 or os9 from command prompt, it brings me to the respective os desktop.
2) Cannot browse internet on any – Error – Security failure. A secure connection could not be established. How do I fix as I was under the impression I could browse natively through each of the macos using MacintoshPi?
3) I transferred .dsk images to pi/downloads and have found them in the unix drive for all os7, os8, os9. Cannot click on any to launch as it says, “The document “name.dsk” could not be opened, because the application program that created it could not be found. Could not find a translation extension with appropriate translators.” What am I supposed to do to physically launch these images? Thanks in advance.
> A secure connection could not be established
Don’t use SLL (https) – eg try site: http://68k.news
Don’t put .dsk on Downloads :) just type:
mac os7 /path/to/name.dsk
If that doesn’t help, take a look how more .dsk disks can be added in Basilisk’s preferences.
Hi Jaromaz,
1) How can I browse more common, mainstream sites, e.g. ESPN, CNN, USAtoday.com, etc? Just typing espn.com won’t work nor http://
2) How can I access the actual Basilisk or SheepShaver settings interface? All of the instructions I see for both emulators are using windows and not rpi. Like sudo padsp ./SheepShaver, where would that be within the RPI?
3) When I try and copy/paste the items stored in pi/download to /pi or /home, I have an error message, “the file operation was completed with errors.” The errors occurred are “error creating directory: Permission denied. Can you be more specific or point me to the right instruction source to load images knowing according to your notes, “applications cannot be launched directly from that directory.”
My apologies if you’ve already answered as I just want to get up and running. If I should email you directly to take this offline/off the blog, please advise.
1. Maybe there are some gateways? Probably it is possible to update certificates in these old browsers.
2. /home/pi/.basilisk_ii_prefs
3. You can’t copy to these directories without the correct permissions. You need to familiarize yourself with the basics of GNU/Linux.
Thanks so much for your help, I finally have it up and running (user error), is it possible to share your config.txt as I can’t reduce the image size on the LCD screen to fit the visible area in the Apple II case?
I’ve tried several options but when it starts Mac os9 it always defaults to full screen so the image is too wide.
Thanks again!
My example configs are included in the assets/altconfigs directory of the MacintoshPi project.
I was wondering what issues you ran into with the Raspberry Pi 4? Is it a matter of updating the scripts so everything builds correctly on Bullseye or is it a 32bit vs 64bit beast? I’m guessing it’s the latter though….
You guessed correctly :)
Hello Jaromaz,
I´ve installed the system in a RPi 2 and it worked fine (OS 9 is a bit slow, but it should be expected), but I have no sound in any of systems (mac os7, os8 and os9).
Sound is working on Pi OS.
On OS8 it gives a message that there is no SOUND device. Did you use the same ROM provided in your design or do have another ROM that can enable sound?
Thank you in advance for your help.
BR
FV
HI, amazing idea and work! Makes it so easy to run different Mac versions! :-D
Only have one issue. I installed this on a Raspberry Pi 3B according to the install instructions and I can’t pair anything bluetooth like my Mighty Mouse. I get input/output errors and timeout errors depending what I have tried. Any ideas?